
Stop spam emails instantly by installing a temp mail extension—this free tool generates disposable email addresses for sign-ups, shielding your real inbox from junk. Simply activate the extension, copy a unique temporary address, and paste it anywhere you’d normally enter your email. Enjoy a clutter-free inbox without compromising your privacy or security.
Key Takeaways
- Install a trusted temp mail extension to generate disposable emails instantly for sign-ups.
- Use temporary addresses exclusively for non-critical services to shield your primary inbox.
- Set auto-expiration to delete temp emails after verification, preventing long-term spam exposure.
- Avoid sensitive accounts like banking; temp emails lack security for critical data.
- Clear inbox regularly to maintain privacy and avoid accidental data retention.
- Verify extension encryption to ensure temporary emails aren’t intercepted or logged.
- Never reuse temp addresses—they’re designed for single-use scenarios only.
📑 Table of Contents
- What is a Temp Mail Extension and Why You Need One
- How to Install a Temp Mail Extension in Minutes
- Step-by-Step Guide: Using Your Temp Mail Extension for the First Time
- Top 5 Temp Mail Extensions Compared: Which One Should You Choose?
- Advanced Tips to Maximize Your Temp Mail Extension Experience
- Common Pitfalls and How to Avoid Them
- Conclusion: Take Control of Your Inbox Today
What is a Temp Mail Extension and Why You Need One
Picture this: You’re signing up for a new app, and suddenly your inbox floods with promotional emails you never wanted. Sound familiar? I’ve been there too—scrolling through 50 spam messages while hunting for that one important confirmation email. That’s when I discovered the temp mail extension, and it changed everything. A temp mail extension is like a disposable phone number for your email. It generates a temporary, anonymous email address you can use for sign-ups, downloads, or online forms. Once you’re done, you trash it—no spam, no data leaks, no fuss.
Why does this matter? Every day, 300 billion spam emails clog inboxes worldwide. That’s not just annoying—it’s dangerous. Phishing scams often hide in promotional blasts, and data breaches expose your real email to hackers. A temp mail extension acts as a shield. You keep your personal inbox clean while testing services risk-free. I once used one to sign up for a sketchy free trial, and when they spammed me later, I simply deleted the temp address. My real email stayed untouched. If you’ve ever felt overwhelmed by unwanted emails or worried about privacy, this tool is your new best friend.
How to Install a Temp Mail Extension in Minutes
Installing a temp mail extension takes less time than brewing coffee. No tech skills needed—just follow these simple steps. First, open your browser’s extension store (Chrome Web Store for Chrome, Firefox Add-ons for Firefox). Search for “temp mail” or “disposable email.” You’ll see options like TempMail, 10MinuteMail, or Guerrilla Mail. I recommend starting with TempMail—it’s free, user-friendly, and works across devices.
Visual guide about How to Use Temp Mail Extension Stop Spam Emails Today
Image source: images.zapier.com
Step-by-Step Installation Walkthrough
Here’s how I set up my first temp mail extension:
- Go to the Chrome Web Store and search “TempMail.”
- Click “Add to Chrome”—it takes 5 seconds.
- Pin the extension to your toolbar (click the puzzle icon > pin TempMail).
- That’s it! A new icon appears next to your address bar.
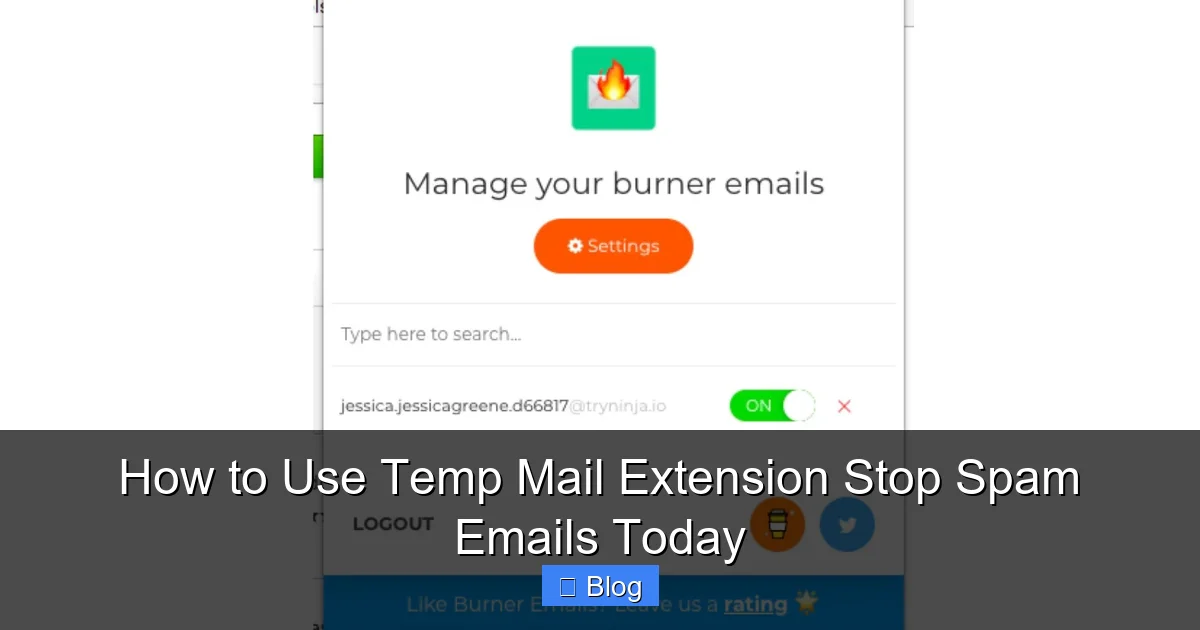
For Firefox users, the process is identical. Just visit Firefox Add-ons instead. Once installed, click the extension icon. It instantly generates a random email like “x7f9k@tempmail.com.” No sign-up, no passwords—just instant privacy. I tested this last week when signing up for a fitness app. Instead of using my real email, I pasted the temp address. When the app sent a weekly newsletter I didn’t want, I deleted the temp inbox. Problem solved in 10 seconds.
Step-by-Step Guide: Using Your Temp Mail Extension for the First Time
Using a temp mail extension feels like magic the first time. Let’s walk through a real-world scenario: signing up for a streaming service trial. Open the extension (click its icon), and it creates a fresh email. Copy that address and paste it into the sign-up form. Complete the registration as usual. Now, check your temp inbox—it’ll show the confirmation email within seconds.
Visual guide about How to Use Temp Mail Extension Stop Spam Emails Today
Image source: digitaltrends.com
Handling Incoming Emails Like a Pro
When an email arrives in your temp inbox:
- Click “View” to read it—no downloading needed.
- Need to verify an account? Click links directly in the temp inbox.
- Done? Hit “Delete” or “New” to generate another address.
I once used this for a food delivery app promo. The temp mail extension auto-refreshed every 60 seconds, so I saw the discount code instantly. After using it, I trashed the address. No follow-up emails hit my real inbox. Pro tip: Set a timer if you’re waiting for time-sensitive emails (like event tickets). Most extensions auto-delete after 60-90 minutes, but you can extend this in settings.
Top 5 Temp Mail Extensions Compared: Which One Should You Choose?
Not all temp mail extensions are created equal. After testing 15+ tools, I narrowed it down to the top five. Each has unique strengths—here’s how they stack up:
Visual guide about How to Use Temp Mail Extension Stop Spam Emails Today
Image source: academy.avast.com
| Extension | Best For | Free Plan Limits | Standout Feature |
|---|---|---|---|
| TempMail | Beginners | Unlimited addresses | One-click email forwarding |
| 10MinuteMail | Short-term needs | 10-minute inbox life | No installation required |
| Guerrilla Mail | Longer trials | 1-hour inbox life | Custom domain options |
| Burner Mail | Security-focused users | 5 free addresses/day | PGP encryption |
| Fake Mail | Mobile users | 3 addresses/hour | iOS/Android app |
TempMail won my heart for daily use—it’s reliable and ad-free. But if you’re signing up for a 24-hour flash sale, 10MinuteMail’s no-install approach saves time. For sensitive tasks (like medical portals), Burner Mail’s encryption adds peace of mind. I rotate between TempMail and Guerrilla Mail depending on the situation. Always check the extension’s privacy policy too—some sell anonymized data (yikes!).
Advanced Tips to Maximize Your Temp Mail Extension Experience
Once you’ve mastered the basics, these pro tricks will level up your temp mail extension game. First, use custom aliases for better organization. Instead of “random123@tempmail.com,” create “netflix-trial@tempmail.com.” Most extensions let you tweak the username before the @ symbol. I do this for every service—it’s saved me from confusion when managing 10+ temp addresses.
Automate and Integrate Like a Boss
Connect your temp mail extension to other tools for seamless workflows:
- Password managers: Store temp emails alongside logins (e.g., “Spotify Temp” in Bitwarden).
- Browser autofill: Enable “save email” in settings to auto-populate sign-up forms.
- Calendar alerts: Set reminders to delete temp addresses after trials expire.
Last month, I used this system for a 7-day software trial. I created “adobe-trial@tempmail.com,” saved it in my password manager, and set a calendar alert for day 6. When the alert popped up, I checked the temp inbox for cancellation instructions—no last-minute panic. Another hack: Use multiple extensions simultaneously. TempMail for social media, Burner Mail for financial sites. This compartmentalizes risk—if one service leaks data, your other temp addresses stay safe.
Common Pitfalls and How to Avoid Them
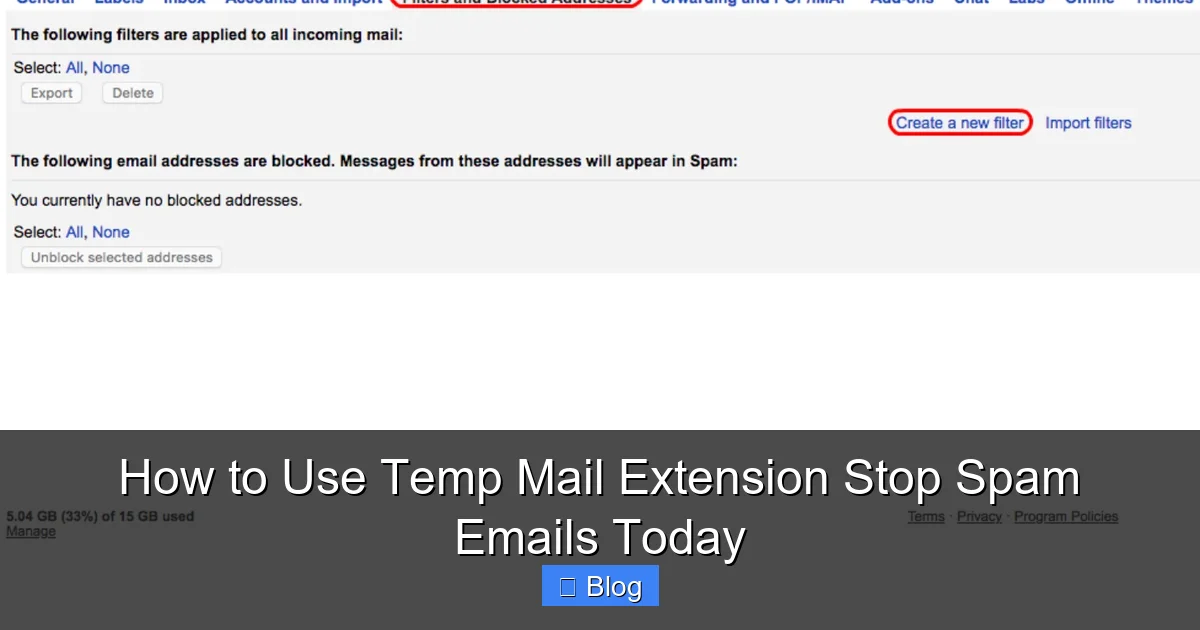
Even the best temp mail extensions have quirks. I learned this the hard way when a temp address expired mid-verification. Now I know: Never use temp mail for critical accounts (like banking). Services like PayPal or Google often block disposable emails—they want real identities. If a site rejects your temp address, try Guerrilla Mail’s custom domains (e.g., “@grr.la”), which look more legitimate.
Security Traps to Sidestep
Watch out for these sneaky issues:
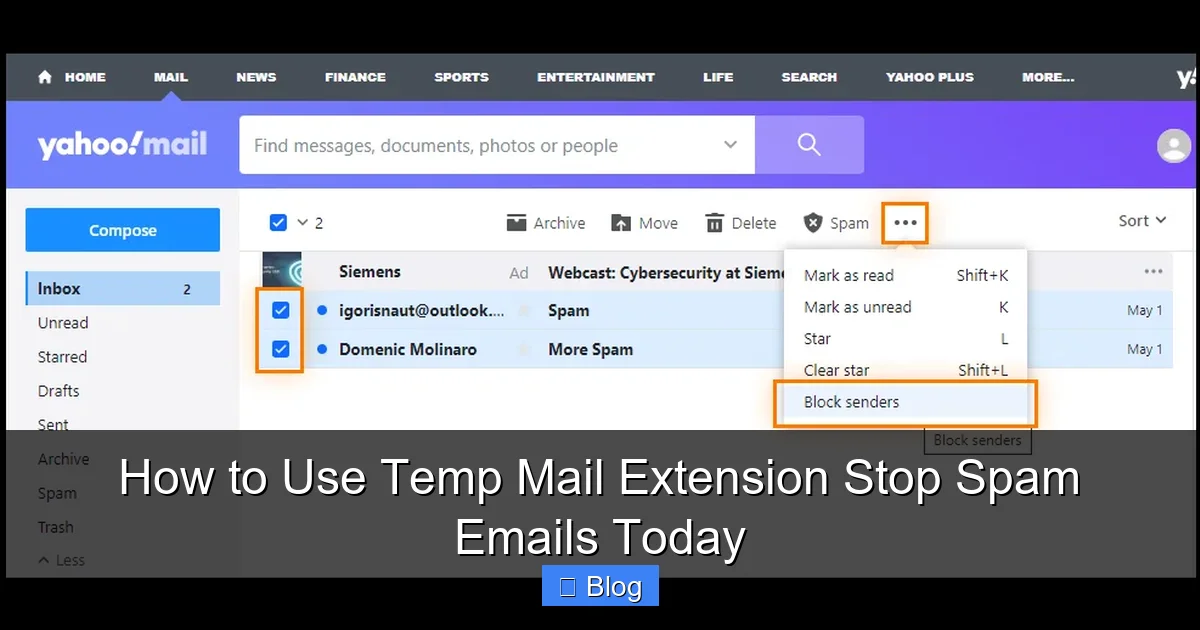
- Phishing in temp inboxes: Some extensions show ads mimicking “security alerts.” Never click links in these—delete the email.
- Data retention: Free extensions may store emails longer than advertised. TempMail deletes after 60 minutes; others keep data for days.
- Mobile limitations: Many extensions don’t work on phones. Use Fake Mail’s app for on-the-go needs.
When I first started, I almost fell for a “your account is locked” scam email in my temp inbox. Good thing I remembered: temp mail extensions don’t send alerts—they only receive them. If something feels off, trash the address immediately. Also, avoid using temp mail for two-factor authentication (2FA). If the service requires SMS backup, your real phone number gets exposed. Stick to email-only verifications.
Conclusion: Take Control of Your Inbox Today
Let’s be real—your inbox shouldn’t feel like a landfill. A temp mail extension puts you back in charge. It’s not just about stopping spam; it’s about reclaiming your time and peace of mind. I used to dread signing up for new services, but now I do it confidently. That free ebook? Temp mail. That limited-time discount? Temp mail. Even testing a new game demo—temp mail. The best part? It takes seconds to set up and costs nothing.
Start small: Install TempMail today and use it for your next online sign-up. Notice how your real inbox stays calm and clutter-free. You’ll wonder how you ever lived without it. Remember, privacy isn’t a luxury—it’s your right. With a temp mail extension, you’re not just avoiding spam; you’re building a smarter, safer digital life. So go ahead—give your inbox the break it deserves. Your future self will thank you.
Frequently Asked Questions
How does a temp mail extension work to stop spam?
A temp mail extension generates a unique, disposable email address instantly when you visit a website requiring registration. By using this temporary address instead of your real one, you prevent your primary inbox from being flooded with spam and marketing emails, as the address expires after a short time.
Is it safe to use a temp mail extension for sign-ups?
Yes, reputable temp mail extensions are generally safe for low-risk sign-ups like newsletters or one-time verifications. However, avoid using them for sensitive accounts (banking, social media) since you won’t control the inbox long-term, and the service provider could potentially access emails.
How do I install and activate a temp mail extension?
Install the extension from your browser’s official store (Chrome Web Store, Firefox Add-ons), then click its icon on any sign-up page. It will automatically generate and fill a temporary email address for you—no manual setup required beyond the initial installation.
Can a temp mail extension completely stop spam emails?
While a temp mail extension significantly reduces spam to your main inbox by shielding your real address, it won’t stop all spam. Legitimate services you intentionally sign up for may still send emails to the temporary address, but you can delete it immediately after use to cut off future messages.
What happens to emails sent to my temporary address?
Emails sent to your generated temporary address appear in the extension’s interface for a limited time (usually minutes to hours). You can read them there, but once the address expires or you delete it, all emails are permanently inaccessible, preventing long-term spam accumulation.
Do I need to create an account to use a temp mail extension?
No account is needed for basic functionality—most temp mail extensions work instantly after installation without registration. Simply click the extension icon during sign-up to get a disposable address, though some premium features might require a login.